Tuesday, July 3, 2012

The Finish

After completing the bridge and before attaching it to the guitar body, the next step is applying the finish to the guitar. The bridge location is critical to the sound and pitch of the guitar and must be established and marked very carefully. As I have stated several times in this blog I have used numerous sources, plans and information from several books in the building of this guitar. I have also stated that sometimes this has been my biggest problem, trying to decide which information or plan to go with. One choice early in the process doesn't agree with future choices made down the line from different sources. This is becoming more of the norm the closer I get to finishing the guitar. This was definitely the case with the bridge placement. All of my books and online sources agreed that placement was critical but they were all slightly different in their method of figuring the placement. At first all my research indicated a simple mathematical solution. The bridge placement is double the length from the nut to the twelfth fret. On further research I found that there was an additional amount added to compensate for the different string thicknesses. This is the part that seems to vary greatly. I finally decided to go with 1/16th of an inch compensation and I hope that works. We will find out when the guitar is finished and strung. If it plays in tune I guess I got lucky. All of this makes my head hurt. . . so I'm going to move on and mark the bridge position on the guitar body and mask it off. This is necessary so there will be no lacquer finish on the body when I finally glue the bridge in position. The other area of the guitar that needs to be masked is the finger board and frets. The sound hole also needs to be masked so no finish gets inside the body.
Masked bridge location.

Masked finger board.

Masked nut slot.

Masked sound hole

Guitar ready for finish.
Once all the necessary areas were masked I was ready to start spraying the finish. I decided to go with a traditional sprayed nitrocellulose lacquer finish. I had some experience with this on other furniture projects and was more comfortable with it rather than trying a completely new process like french polish, a shellac process or the newer waterbased lacquer products. I decided to go with Behlen Stringed Instrument Lacquer because it was available in quart containers rather than gallon containers and I only needed about one quart, making it more economical and it was specifically made for instruments. I ordered it and the necessary Behlen Vinyl Sealer online and received it in 2 days. I later found that I could have purchased it locally at Woodcraft. I called them to see if they had it and was told they did not, only to find it myself when I was in the store later, oh well next time. I started by spraying two light coats of vinyl sealer sanding lightly between coats. After the sealer dried overnight I sanded again with 320 grit wet dry paper and a little water. I was surprised at how hard the sealer was. I have found most sealers are very soft and easy to sand, this was not the case with this product. I found it necessary to use water to keep the paper from clogging up. I then moved on to the final finish lacquer. The Behlen company recommends using this product without thinning but I felt it was a little thick straight from the can so I thinned it with 1/3 standard lacquer thinner. This seemed to spray well and flatten out nicely for me. I sprayed  two coats a day then sanded the next day and started all over again. I worked from 320 grit on the first day then moved to 400 for the next three days and finally 800 for the last two days. In all a little over 10 coats with light sanding between coats. During this process there were a few specs that needed more attention. I used straight lacquer from the can and a tiny art spotting brush to apply extra lacquer to these spots. I allowed them to thoroughly dry and sanded and scraped them smooth. The thicker lacquer acted like a filler and worked nicely. Overall because of the tight grain of the maple I did not have to use any filler on the body. As mentioned in an earlier post I did use a thick CA glue as a grain filler on the head inlay.
First coat of finish makes a big difference in the tone and grain.

First coat on the back.

Spraying finish.

Spraying.

More spraying.

Top after two coats, 8 more to go!

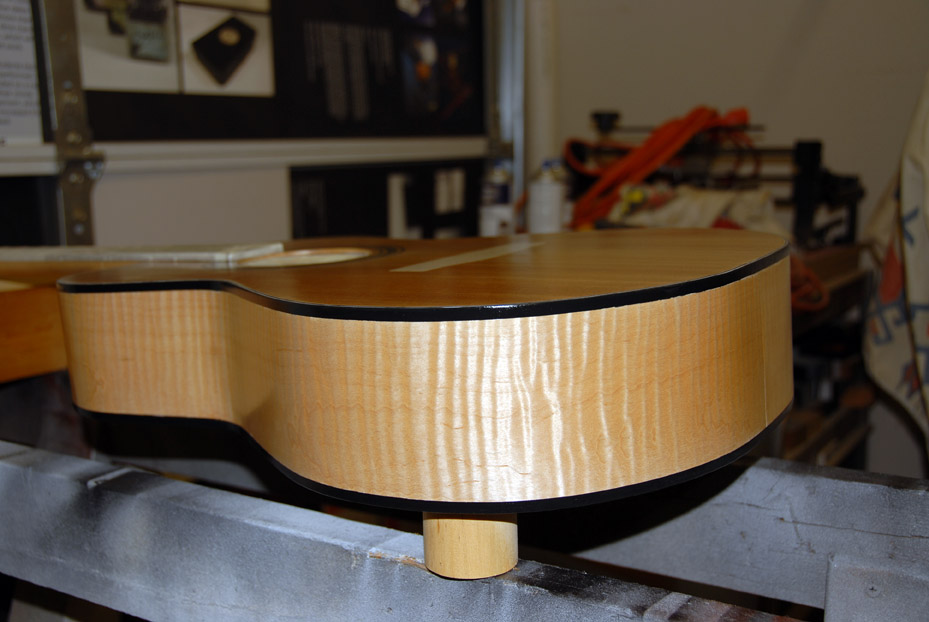
Wow, flamed sides look great!
After approximately 12 coats, I decided to stop. The finish now must thoroughly dry before polishing it to a mirror finish. I am going to let it set for at least 20 days before I start the polishing process. I am extremely pleased with the way it looks now! I am getting really close to finishing but there are still some critical steps remaining. I have to attach the bridge and make the saddle and the nut before I can string it up but my dream is in sight and I couldn't be more excited.

Friday, June 29, 2012

The Bridge

The next step in the process was to make the bridge. Keeping with my established color and wood tone the logical choice was a bridge made from rosewood. I cut a piece of rosewood and created a blank approximately 2"x7"x3/8". I based the basic shape and size of the bridge from plans printed in the Guitarmaking, Tradition and Technology book by William Cumpiano. Before I strated to shape the blank I sanded the bottom to conform to the radius of the guitar body top. To get a perfect match I placed a half sheet of 80 grit sandpaper on the guitar top and sanded the blank using very light pressure until I got consistent scratch pattern on the bottom.
Rosewood bridge blank.

Sandpaper in position on guitar top.

Sanding using light pressure.

Continue sanding until even pattern on bottom of blank.
Once the bottom of the blank fit the contour of the top I was ready to start shaping. I transferred the basic shape of the bridge and cut it out on the bandsaw. I switched to the drum sander to smooth out the shape and start reducing the thickness on the outside edges. I used the drum sander to get the basic shape and contour of the top of the bridge and finished by hand sanding down to 320 grit sandpaper. At this point I transferred the peg hole positions and the angled slot for the saddle from the plans. Because of the dark woodtone I found that I needed white position markings. I printed off a copy of the plans and used white chalk to rub the back of the print. I then flipped the print over and positioned it on the rosewood bridge. I then traced the peg hole positions and the saddle slot transferring them to the wood in white.
Peg hole potions and slot marked in white.

Bridge in rough position on guitar top.


I then used a drill press to drill the peg holes using a 3/16" brad point drill bit. Once the holes were drilled I used a countersink bit to bevel each hole. I then reamed each hole carefully with a 5 degree reamer until each pin fit perfectly. The next step was to rout the slot for the saddle. I built a simple jig to hold the bridge with a straight piece of wood set at the same angle to act as a guide rail for my Dremmel router. The slot not only needed to be at the right angle but also needed to be the right depth and the right thickness. The depth was fairly easy to get because my precision router base let me adjust the bit depth slowly as I made several passes. The correct thickness of the slot proved to be a bit more difficult. The saddle I had was a hair over 1/8" thick, so my 1/8" bit was slightly small. Once I had the correct depth I applied layers of masking tape to the guide rail and made more passes with the router. The tape pushed the router down slightly making a wider cut. This seemed to work. I probably could have just sanded the saddle to get the right thickness. I don't know if it would have been easier to do that or not. The final step was to polish the bridge with 0000 steel wool.
Hold down jig with bridge in place.

Dremmel router cutting slot.

Dremmel cutting slot, notice the tape on the guide.

Polished bridge in rough position.

Attaching the Neck

Before attaching the neck I had one small detail to finish on the neck. I wanted a small end cap of rosewood on the heel of the neck to help with the transition of the neck to the back of the guitar. I cut a small piece of rosewood and resawed it on the bandsaw to approximately 1/8" thickness. I roughly shaped it to the heel and glued it on to the heel. I secured it with a bar clamp and let it thoroughly dry. After the glue had dried I continued to shape with a rasp and then sanded it to fit.
Gluing and clamping the heelcap.

The heelcap in postion.

In an earlier post I stated that I attached the neck to see if it fit and aligned properly. I could have permanently attached the neck at that point but that would have meant that all of the fret work would have to be done on the neck while attached to the body of the guitar. Many luthiers do the fret work after the neck is attached but that means special care must be used when installing the frets over the body. I decided that it would be easier to work on the frets while the neck was still off the body. Some luthiers even install the frets in the fret board before installing the fretboard to the neck. I don't think any one method is any better than another but keeping the neck separate until all the frets were in place seemed the most logical to me. Now that the neck is complete it is time to attach it to the body. I again tried a dry fit to make sure everything fit and aligned properly. I was now ready to glue and attach the neck. I cut two small piece of wood the same width as the neck to use as a cauls on the top and under the sound board. These cauls would protect the neck and the soundboard from the clamps. I applied white glue to the under side of the fingerboard and carefully attached the neck to the body. Going through the sound hole I inserted the two bolts and tightened them with an allen wrench. I used two C clamps through the sound hole and one bar clamp on the outside to apply even pressure while the glue dried. I also used one bar clamp on the heel and the bottom of the body to pull the neck tight on the top of the guitar.
Gluing and clamping the neck to the body.

2 C clamps through the soundhole.
I allowed the glue to dry overnight before removing the clamps. White glue was used because it is a little easier to remove with heat if the neck ever has to be removed for repairs.

Fret'n About Fretting

In a previous post I talked about the difficulty in preparing the fret board, particularly the accuracy necessary in the fret slot positions. I was now ready to actually install the frets. I had stalled as long as I could and now I really had to jump in and do it. The first step for me was to prepare the fret wire. The fret wire that I had ordered came in straight lengths two feet long. This fret wire needed to be bent to a curve shape that matched the radius of the fret board. I researched lots of methods for bending and looked at several special fret bending tools. I thought about building a fret bending machine from plans that I got from the internet but finally decided to take a much more simple approach on this guitar. I read several articles that stated that you could effectively bend the wire by pulling it down over an edge of hard wood. The effect is similar to curling ribbon by pulling it against the edge of a pair of scissors. I started by filing a v groove in the edge of a piece of 1x4 lumber. This groove was for the tang of the fret wire to slide through and help guide the wire as I pulled it down and over the edge. I used the wooden handle of a dust brush to hold the wire down as I pulled it through the slot. This method seemed to work pretty well, although the starting end needed a little attention as it remained flat. This method puts a nice arc on the wire but there is no real method of getting the radius exact. I think when I build my next guitar I will go ahead and spend some time and make a bending tool but this method was certainly quick and easy and it seemed to work fine.
Inserting the tang in the v groove.

Using the wooden handle to hold the wire in position.

Pulling the wire through the slot to create the curve.
The next step was cutting the wire to length. I cut the wire long to allow about 1/8 inch overhang on each end.
Measuring wire with the fret slot.

Cutting the wire.
I used a little water and a drop of white glue to help set the wire in the slot. I used a small plastic palette knife to drop and spread the water into the slot. I then used my specialized glue spreading tool to apply a small amount of white glue to the tang of the fret wire.
Spreading water into the slot.

Applying glue to the tang of the fret wire.
I then carefully positioned the wire in the slot making sure the tang was square and in position in the slot. I seated the wire on one side with the fret hammer and worked my way across the face of the wire to the opposite side. After a few times I could easily see, feel and hear the fret as it seated properly.
Positioning the wire in the slot.

Tapping the wire into the slot with the fret hammer.

Working my way across the slot.
After I was sure the wire was seated properly I cleaned up all the glue with a wet sponge and trimmed the excess wire overhang. A good pair of fret wire cutters makes this part easy and saves a lot of excess filing later.
Cleaning up excess glue.

Trimming wire overhang.
As it turned out all my "fret'n" was for not and the fretting process was one of the easier parts of this long journey.
Finished neck with installed frets

Finished fret installation.

Tools
After the frets are successfully installed, they still need some finish work. The edges must be filed and polished and the entire fretboard must be leveled. The ends of each fret are burred by the cutting process and must be filed flat and then beveled for smooth playing. You can do this with a standard metal file but I decided to make a simple file holder to make this process more uniform. I started by cutting two pieces of maple 3"x8"x1.25". I cut a straight 90 degree slot approximately 1/2" from one edge and approximately 5/8" deep. This slot will hold a file, allowing it to stick up about 5/8" above the block. This file block can now be used to run on top of the frets with the file running along the edge filing the frets back to a flush 90 degrees. The other block I cut a similar slot to hold the file but I angled the blade so I cut a 35 degree slot to bevel the frets back and soften the edge.
Maple blocks with 90 degree and 35 degree slots.

Blocks and file.

File inserted into angle slot.
After the edges of the frets were filed smooth the bottom of the slots need to be filled. Thick CA glue was used for this then sanded smooth.
CA glue and fret board.

Filled slots.
The final step was leveling the frets, then filing and finally polishing with steel wool.I used a fret leveling file and the radius block to apply the same radius that was used on the finger board to the frets. Each fret was then reshaped with a fret file and then polished with 0000 steel wool.
Finished fret board and fretting tools.

Thursday, June 28, 2012

Summer 2012

My last post was way back in April. Well, summer is finally here and with summer comes a welcome break from my day job as a Design Educator. For the past twenty plus years I have taught at least one class during summer school. This year the class that I was scheduled to teach didn't have enough enrollment to make, so, I guess I get the summer off. My plan was to finish the guitar and spend some time doing some things that I want to do. I am sure there will be plenty of things to keep me more than busy all summer long.

Back to the guitar and my progress. It is now late June and I have been working fairly steady on the guitar. I started by gluing the head veneer on the head and working on the decorative inlay. I decided to use a piece of the flamed maple that I used for the sides as the head veneer. The entire neck, including the head is maple. The back of the guitar is also maple with a small strip of rosewood down the center. The sides are also maple but they are curly/flamed. This gives the sides an extremely interesting grain pattern. I want the entire guitar to be light in color including the head so I chose a piece of curly maple for the head veneer. To add just a touch of color and to help tie the rosewood strip on the back and the rosewood fingerboard to the guitar color scheme, I also sandwiched a very thin piece of mahogany veneer between the head stock and the curly maple head veneer. This left a hairline stripe around the guitar head edge. I decided to use a version of my graphic design company logo (The Hefner Group) as the head inlay.
The Hefner Group logo.
 The first step was to cut the head veneers and glue them in place.
Clamping the head veneers in position using a clamping caul.

A variety of c-clamps were used to give even pressure.

Six clamps and a caul on the top and the bottom were used.
After the glue set up, I removed the clamps and trimmed and sanded the veneers flush with the head stock. My original idea was to inlay the logo using small squares of mahogany veneer leaving a hairline gap between each square that I would fill with black epoxy to create an outline effect. Nice plan but my inexperience with this kind of detail proved to be to big of an obstacle for me to overcome.
As you can see, I had trouble getting consistent gaps between the shapes.

After several tries I decided to try something a little different. I had worked with laser engraving on other projects and I knew I could get a beautiful engraving of the logo on the mahogany. It should then be much easier inlaying one piece. First I had to rout out all of the pieces from previous attempts. I created a simple template using the edges of my Dremel precision router base as guides.
Thin strips of oak were tacked down to act as guides.

Depth of cut was set to the thickness of the veneer.

Veneer was carefully removed leaving a square recess for the laser engraved logo.
A little attention to the corners with a small chisel and I was ready to cut and insert the engraved logo.
The final inlay.
The engraved logo looked great and the mahogany was the right color but the grain was to pronounced. I ended up using thick CA (super) glue as a grain filler. Several coats were applied and scraped off until I got a smooth surface texture that matched the maple.