Saturday, December 24, 2011

Back in the Shop

In my last post I got caught up on the blog posts and my working status on the guitar. I mentioned that the Fall semester was over and that I was hoping to use the time over Christmas break to get back to work on the guitar. Well I did just that! Most of my previous work had been done at Matt's shop but I brought most of the project home at the end of summer to work on it in my garage shop at home and to get it out of Matt's way in his shop. I thought I would be able to work in the evenings at home and continue to make some progress. Well, that didn't seem to happen but now with a few free days I was able to start working again.

At the end of the summer Matt and I built a little jig to help laminate plastic binding strips together. It was a simple little contraption based on a Stewart-MacDonald design that I had seen in their catalog.
Binding Laminator
The idea was to apply acetone to the plastic strips and run the two strips through the spring loaded jig to glue the strips together. The jig worked well but I quickly realized that, like most things, this would be much easier with two people. On my first attempt the strips weren't aligned properly but I was later able to sand down the mis-aligned strips and make them a uniform width. The next strips were a little better but it was difficult to get the acetone on and run the strips through the jig quickly before the acetone dried. I found that I could only do a few inches at a time.

Laminator

Laminator in vise

Running black and white binding through spring loaded jig.

Pulling binding sandwich through.


applying acetone as glue.

All the materials.
My goal was a black and white binding on both the top and back with a black and white purfling to match the outer and inner rings on the rosette. After laminating the binding strips and the purfling I sanded the edges to clean them up and get them ready to adhere to the guitar body.

The next step was to rout the channels on the body edge to accept the binding strips. I purchased an attachment for my Dremel Precision Router Base from Stewart-MacDonald called an edge guide to help me cut these channels. This tool allows for very accurate and delicate depth settings to match the width and thickness of the binding material.

The edge guide attached to the Dremel tool.
The purfling channel was cut first to the depth of the purfling and the width of both the purling and the binding. After that channel was cut on the back the body was turned over and the same channel was cut in the top. The edge guide and bit depth were then adjusted to fit the binding. This channel was then cut in both the back and the top.

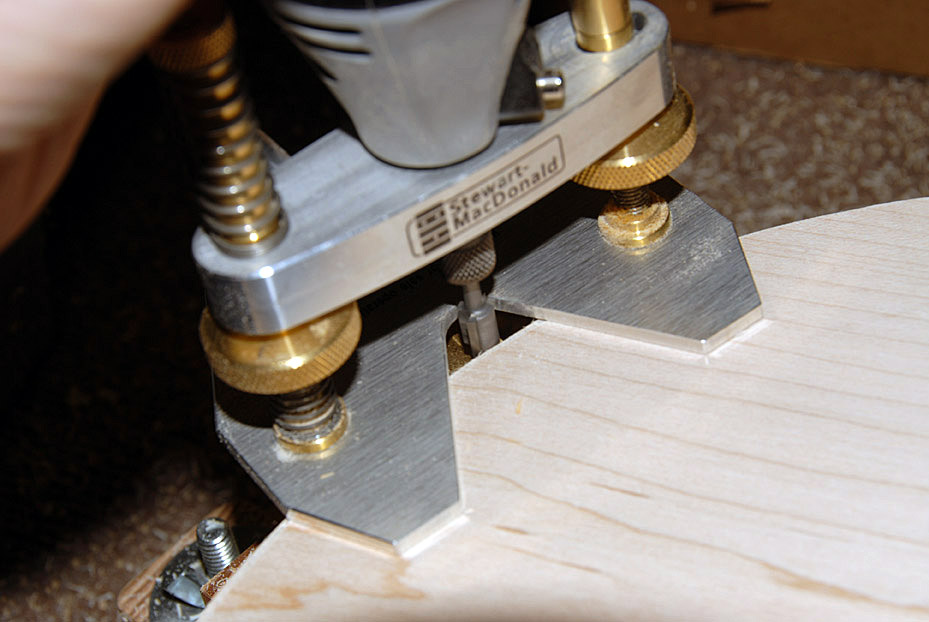
The Dremel tool routing the purfling channel on the back.


The Dremel routing the binding channel on the back.


Binding and purfling channels on the back.


Detail of both channels.

Detail of both channels on the back.

Channels being routed on top.


Top with channels cut.

After the channels were routed in both the top and back they needed to be cleaned up with an assortment of small jewelers files, fingernail files and emery boards. The channels needed to be burr free and a consistent depth to fit the bindings. At this point I realized I had some problems with consistency in my channel width. After close examination I saw that I had a couple of places on the top of the back that the channels were not as wide as they should be. I think the reason for this inconsistency was due to some imperfections in the sides caused in the bending process. I now think that if I had spent some time sanding out the sides this might not have been as big a problem. The edge guide uses the sides as a bumper/guide to control the cut. If there is a bump or valley it will be transferred to the channel cut. Also, if the sides are not perfectly square (which I am sure mine were not) the channels will not be consistent. I spent a lot of time trying to work out the inconsistency in the channels and still had some problems when I glued the bindings in place.

An emery board makes a great tool because it is flexible.


Tools used to clean up channels.
Attaching and gluing the bindings in place presented another challenge. All of the research I had done indicated that you could glue both the purfling and binding in place at the same time. This proved to be to difficult for me to accomplish. The glue that was recommended was a solvent based glue similar to the old fashion model airplane glue that I used as a kid. This glue is very fast drying glue and is very messy. There was no way I could apply the glue to all parts and get it in position without having a drying problem, not to mention having glue all over me and more importantly the guitar. I quickly decided to attach the purfling first then go back and attach the binding. This took a lot longer because I had to allow the glue to dry at least an hour before applying the binding. Again, like the lamination process, I found that I could only work in short (4-6 inch) segments. I would apply the glue then go back and fit the binding in place then quickly secure it with a piece of painters' tape and move down about an inch and repeat the process. The painters' tape was used so the low tack adhesive would not pull up the wood fibers on the soft spruce top.

Applying the tape to hold the glued binding in position


Purfling glued in position.

Detail of purfling.

Detail of purfling.

Detail of purfling showing the end seam.

Binding on back fully taped.
Purfling on top fully taped.
Binding and purfling installed.

Detail of binding and purfling at waist of top.

Binding and purfling on back.

Completed binding.
The materials.

No comments:

Post a Comment