Thursday, June 28, 2012

Summer 2012

My last post was way back in April. Well, summer is finally here and with summer comes a welcome break from my day job as a Design Educator. For the past twenty plus years I have taught at least one class during summer school. This year the class that I was scheduled to teach didn't have enough enrollment to make, so, I guess I get the summer off. My plan was to finish the guitar and spend some time doing some things that I want to do. I am sure there will be plenty of things to keep me more than busy all summer long.

Back to the guitar and my progress. It is now late June and I have been working fairly steady on the guitar. I started by gluing the head veneer on the head and working on the decorative inlay. I decided to use a piece of the flamed maple that I used for the sides as the head veneer. The entire neck, including the head is maple. The back of the guitar is also maple with a small strip of rosewood down the center. The sides are also maple but they are curly/flamed. This gives the sides an extremely interesting grain pattern. I want the entire guitar to be light in color including the head so I chose a piece of curly maple for the head veneer. To add just a touch of color and to help tie the rosewood strip on the back and the rosewood fingerboard to the guitar color scheme, I also sandwiched a very thin piece of mahogany veneer between the head stock and the curly maple head veneer. This left a hairline stripe around the guitar head edge. I decided to use a version of my graphic design company logo (The Hefner Group) as the head inlay.
The Hefner Group logo.
 The first step was to cut the head veneers and glue them in place.
Clamping the head veneers in position using a clamping caul.

A variety of c-clamps were used to give even pressure.

Six clamps and a caul on the top and the bottom were used.
After the glue set up, I removed the clamps and trimmed and sanded the veneers flush with the head stock. My original idea was to inlay the logo using small squares of mahogany veneer leaving a hairline gap between each square that I would fill with black epoxy to create an outline effect. Nice plan but my inexperience with this kind of detail proved to be to big of an obstacle for me to overcome.
As you can see, I had trouble getting consistent gaps between the shapes.

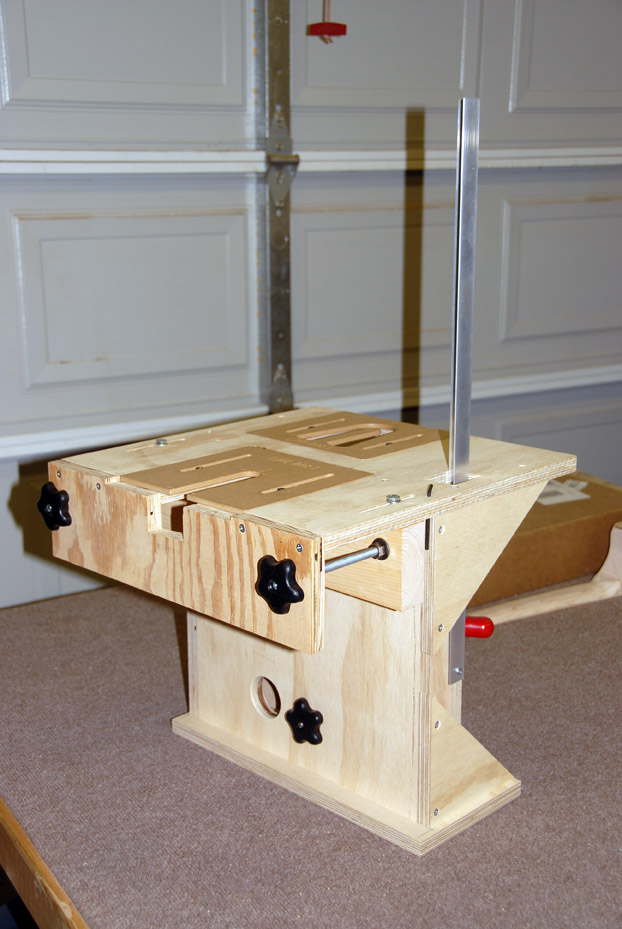
After several tries I decided to try something a little different. I had worked with laser engraving on other projects and I knew I could get a beautiful engraving of the logo on the mahogany. It should then be much easier inlaying one piece. First I had to rout out all of the pieces from previous attempts. I created a simple template using the edges of my Dremel precision router base as guides.
Thin strips of oak were tacked down to act as guides.

Depth of cut was set to the thickness of the veneer.

Veneer was carefully removed leaving a square recess for the laser engraved logo.
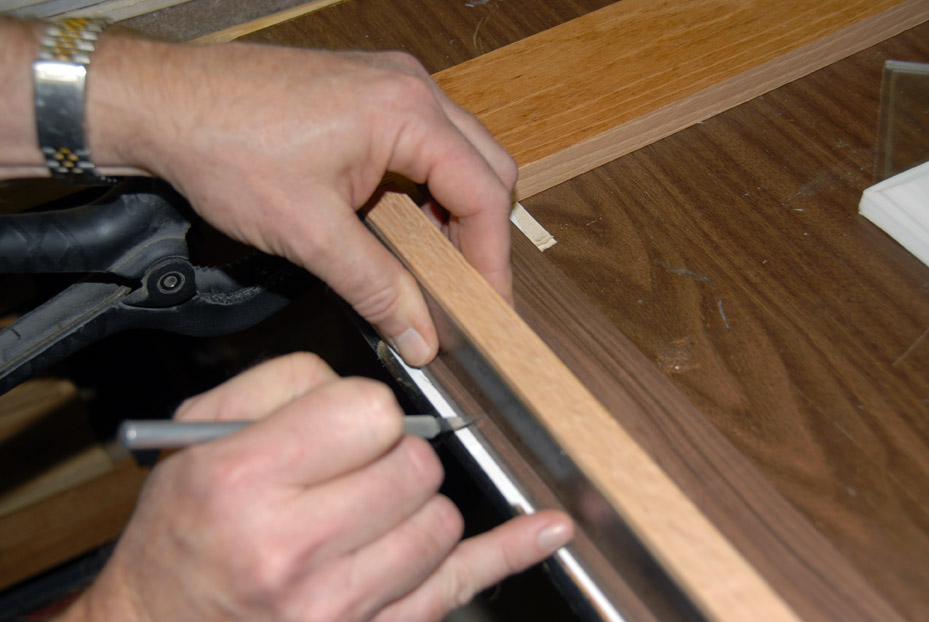
A little attention to the corners with a small chisel and I was ready to cut and insert the engraved logo.
The final inlay.
The engraved logo looked great and the mahogany was the right color but the grain was to pronounced. I ended up using thick CA (super) glue as a grain filler. Several coats were applied and scraped off until I got a smooth surface texture that matched the maple.

Monday, April 2, 2012

Fitting The Neck and Body Together

 After radiusing and sanding the fingerboard top down to 320 grit sandpaper I was able to finish shaping the neck. At this point I needed to see if the neck was going to fit on the body. I inserted the barrel nuts into the neck and positioned them as close to straight as possible. I then slid the tenon on the neck and into the mortise cut in the body of the guitar. I was able to insert the allen wrench for the bolts through the sound hole and through the hole in the under brace that I had drilled early in the construction. I then inserted the wrench into the truss rod in the neck and slowly guided it into place in the mortise slot. I then inserted the two bolts through the sound hole and into the barrel nuts in the neck joint. I tightened them by hand then using the allen wrench, I tightened them to pull and seat the neck firmly into the mortise in the body. AMAZING it fit! It even looks straight. It finally looks like a guitar. Another one of those a-ha moments. I really think it's going to be a guitar!
Finally it looks like a guitar!


The Neck Joint

When I first started this guitar I decided to use a traditional dovetail joint to attach the neck to the body. I thought that was the preferred joint and the type that Martin Guitars used. If it was good enough for a Martin it should be good enough for me. As I mentioned early on in this blog the first book that I purchased did not match the plans that I was using. One of the biggest discrepancies in the book and the plans was the neck joint. The book advocated a Spanish Heel method of attaching the neck. This method does away with the traditional joint and attaches the neck to the soundboard by gluing before the body is closed. Since I had never heard of this method and what minimal research I had done at this point indicated this method was usually used in classical guitar construction I decided to buy a new book. I then started researching different types of neck joints. I discovered that more and more luthiers were going to the bolt on mortise and tenon neck rather than the dovetail. I found one article that said even Martin had started building their guitars with bolt on necks. It did seem to be easier and once again if it was good enough for Martin it was good enough for me, so I decided to go with that method. The more I researched the more convinced I was but it appeared that the joint was going to be more critical than I had first thought. Keeping the joint straight and at the right angle for proper string height seemed to be so critical that I would need some sort of jig/template to get it right. I did internet research, watched youtube videos and looked at luthier supply catalogs. As with all the other problems I encountered there were many solutions. Some very simple and home made others relatively expensive. I decided that a jig designed by Robert O'Brian and distributed by Luthiers Mercantile International (LMI) was the best bet. So, I dug in my pockets one more time and ordered the kit and instructions. The kit supplied the instructions and parts, I had to supply the wood. It took me several days to build (remember I am part time, and slow.) I am very satisfied with the end result, a very nice and sturdy jig to route the mortise and the tenon.
Finished jig.


Finished jig.


Jig clamped to table showing neck clamped in position.

Body clamped in position.

Body ready to route mortise.

Plunge router set for mortise.

Mortise template

Finished mortise.

Neck set to route tenon.

Router in position.

Tenon template.
Finished mortise and tenon.


Monday, March 19, 2012

Fingerboard

Realizing that I couldn't finishing shaping the neck until I finished and attached the fingerboard I started working on it. I cut an over sized blank out of 4/4 rosewood 3" wide and 22" long. On the band saw I split the blank into two 3/8" thick pieces. Using Matt's drum sander I took these down to 1/4". The finished finger board would be 18" long and tapered from 2.25" to 1.75". Remembering the problems I had with the neck when I tapered it to early, I left the blank square with straight sides. I then started marking the fret positions. This turned out to be a very tedious task. As you could imagine the frets had to be very precisely positioned or the guitar would never be able to be tuned accurately. The positions had to be accurate within 1/64". The first problem was to find a ruler that was at least 18" long and marked in 1/64" increments. I checked all of my rulers and 1/32" was the smallest increment of any that I had. I started looking to purchase one and couldn't find one locally. Matt to the rescue again! He had exactly what I needed. My vision is pretty good but I couldn't see well enough to measure and mark that small of an increment. Luckily my wife does a lot of sewing and needle craft and she had a large clamp on magnifying lamp. I couldn't have done this without that!
With the magnifying lamp I was able to see the correct position marks but I had a problem with marking them. No matter how sharp my pencil lead was it was to fat to accurately mark the positions. I resorted to an X-Acto knife with a standard number 11 blade that I could run down the engraved mark on the ruler and slightly score the wood.
Setting up the ruler at a 90 degree angle on the finger board.
Marking the fret positions with an X-Acto knife.
Once I had the fret positions marked I was ready to start cutting the fret slots. I had purchased a fret saw from Stewart MacDonald. The saw came with a plexiglass depth stop. They also sell a miter box that goes with the saw and templates that would make cutting accurately positioned slots much easier but I decided to try make something that would work and save some money. Speaking of saving money, it didn't take long for me to realize that building a guitar was not going to save me money. One of the first questions I get asked is how much will it cost? The answer that I usually give to this question is that by the time this instrument is finished I could easily have purchased a very nice Martin but it's not about saving money it's about the experience! The second guitar will be much cheaper. . . and yes, I am planning another.
My homemade miter box, fret saw and slotted finger board.

Clamping the miter box and saw guides to the work bench.

Clamping left saw guide

Applying candle wax to the saw blade.

Making the cut.
After the slots were cut I marked the length and the taper and cut those using a table saw. The finger board was now ready to mount on the neck. I drilled 1/16" holes in the first fret slot and in the 10th fret slot. I installed the truss rod into the previously cut channel and covered the top of the aluminum with masking tape to keep glue from getting on the rod. I applied a thin coat of wood glue to the top of the neck and quickly pealed the masking tape off. I positioned the finger board on the neck and tapped in two 3/4" brads into the previously drilled holes to keep the finger board from slipping under pressure. I applied pressure by wrapping long rubber strips that I cut from a bicycle inner tube around the neck and finger board. I set the assembly aside to dry over night.
Brad inserted into small hole in slot to keep the finger board from slipping.

Second brad to keep finger board straight.
Applying pressure with rubber band strips.
Finishing tight wrap.
Removing brads after the glue has set.

After the glue set up I finished the shaping and sanding of the neck. At this point I started finishing the finger board by sanding a radius to the top. I purchased a sanding block with a 12" radius from Stewart MacDonald and used it to finish the top of the finger board.
Course 80 grit sandpaper was used to establish the radius.
A simple jig was used to keep the block at 90 degrees. A clamp was used as a quick handle.
finer grit sandpapers were used to finish the radius.

Spring Break 2012

As you have gathered, I really only have time to update my posts during breaks from my day job. As I mentioned in an earlier post I am always amazed at how much time work takes away from the important stuff like building a guitar or updating the blog on building a guitar. Well, it is Spring Break and I have a little time to do just that so, here goes. My last post was over Christmas break and I got the blog caught up and made some progress on the guitar. I completed the binding and purfling on the guitar body. As with every step in this process it was a huge learning adventure. I was not completely satisfied with the end result but decided to continue and try and work through the problems. At this point I decided to go back to the neck and start (continue) working on it. It was the very first part of the guitar I started with and once I had a rough shape I moved on to other parts. To recap, I glued up maple to create a blank for the neck. I rough cut the blank to the basic neck shape. Planed the head to get it smooth and flat, then cut the sides to finish the rough shape. Well, as it turned out, I shouldn't have cut the sides. As I found out later they needed to be square to use as a guide to route out the channel for the truss rod. Luckily I still had the scrap pieces I had trimmed of on the band saw. For once it paid off being cheap and never throwing anything away! I reattached the side pieces temporarily using a brad pinner and a couple of well placed 3/4" brads on each side. This worked well and gave me straight edges again to use as guides to run along the fence on the router table. The truss rod that I decided to use is a Martin style 7/16" wide x 13/32" deep, aluminum U channel assembly. I used a 7/16" straight router bit so I could cut the channel width in one pass. The 13/32" depth was cut in several passes to get a cleaner cut. The fence  was set to cut the channel in the center of the neck. Stops were set for the length of the cut and the depth of the bit was set to approximately 1/8". Several cuts were made extending the depth until the final cut at 13/32" was made. After the channel was cut in the neck I simply pried the sides off and removed the brads. I could now start shaping the neck. I started by cutting templates out of pvc plastic to use as guides for the curve of the under side of the neck. One was cut with the appropriate radius under the 10th fret and one for under the 1st fret.
First and tenth neck radius templates.
The idea here is fairly simple start at both ends of the neck and establish the right radius and then connect the two with a smooth transition.
Clamp neck to work table.

Cutting radius with rasp.

Checking radius with template

Using rasp to cut first fret radius.

Checking first fret radius.
 Shaping the neck takes a lot of hand work with a wood rasp and a spoke shave. Once I was close to the final shape I realized that the finger board needed to be attached before the final shaping.